


Hi there! Are you on my real blog? If not, click and come on over. I spiced things up a bit with my design and I love it even more than before! My social media icons are easy at the top and everything flows a bit better. I also have a new closing to my posts too! Some friends were talking about designs, and ideas for there’s, and it sparked my creativity! I hope you like it!
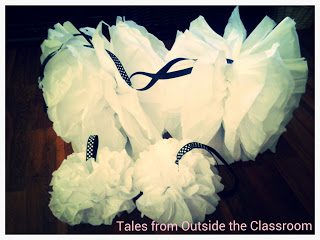
On another note, I wanted to share some cute, easy (because I don’t have that craft gene), and CHEAP projects with you that I’ve been working on. I spent less than $10 on everything I’m showing you today thanks to Dollar Tree and some cheap finds elsewhere. First, I was working on these fun puff balls that I’m going to hang over my reading area. I learned some tricks along the way so I thought I’d share them with you. There’s also some ways that you can change it up, so I’ll share them as well.

If you are going to do a large ball, take 16 or so sheets of tissue paper and stack them neatly. I just bought the large white set from Dollar Tree. I used 8 sheets and then 12 sheets, and I still wished I had more. On the half balls above, I used 12 sheets and they were quite full (because there’s not as much space to expand them to). With the small ones, 8 sheets is probably good.

Accordion fold the stack in 1 inch sections. Please don’t measure. Just eyeball it. This is an easy peasy process. When I made my first one, I felt the folds didn’t stick so well so I set the stack under a book for a few days. Once it was done, though, both balls looked the same so I don’t think it matters much.
If you want to make the small balls, cut the strip in half so you have two smaller pieces. Doing this cut after the accordion fold makes it much easier.
 Tape or staple the center of the stack. I used tape so I had to wrap the tape all the way around so the pieces didn’t separate. Once it’s together, tape or staple a looped piece of ribbon in the same place. You can make the ribbon loop as large or small as you’d like.
If you want to make your edges rounded, trim the edges on both sides. This does not need to be exact either. You can also make things more pointed by just diagonally cutting the corners.

And that’s it! Just separate each sheet and fluff everything out.


As you can see, this one is quite full. If I used the same amount of sheets in a large ball, it would be much more loose as there’s more space to fill.
The other project I’ve been working on is decorating some clothespins. I’m going to hot glue them to a bulletin board and display work in the hallway. They had to be just a bit cuter though! 🙂

I picked up this big set of clothespins for $1.69 from a home improvement store. I bought this washi tape from Staples so that I could reach my $5 minimum on those awesome deals. I love this herringbone print!

Voila! Much cuter and so easy to do!
If you’re working on your summer craft projects to get ready for back to school (gasp!) don’t forget that JoAnn Fabrics has an every day 15% discount for teachers. JoAnn is the craft store right around the corner from me, so I’m there often picking up the things I need. If you want to see more about their teacher programs, click here.
I’m also going to link up with Monday Made It for the first time! I am excited to see the other great craft ideas from this week!


8 Comments
You are the best! Thanks for sharing that tutorial! I have been debating on whether or not to buy those premade puff balls. Now I think I will just buy the tissue paper and try and make them myself! I wonder if you could put 2 colors together? Thanks Tessa!
Karen
An Apple a Day in First Grade
You probably could! I can't find black tissue paper (probably because no one sends presents in black- morbid!) or I'd try it myself. That was my original hope!
Did you try Amazon? They have everything! Or an art supply store? We had black tissue paper one year at Halloween. Our art teacher did a few seasonal art projects with it. AND my friends wrapped my 50th birthday presents in black tissue paper… aren't they nice? LOL!
No, I didn't! Good suggestions to check both!
@Karen, You can def use multiple colors. Mine are larger and two colored. check my blog post to see them. Tessa – yours look great. I'm def gonna Washi tape some clothespins too.
KaSandra
http://memoriesmadeinfirst.blogspot.com
I always make my big poms with 8-9 sheets and then wonder why they look a little deflated halfway through the year. Duh! I need more paper! 🙂
Nicole
Teaching With Style
They turned out super cute as little balls though!
I'm planning on taping some clothes pins also. I had already bought the stuff just haven't done it yet.